How to Sew a Bookmark! | Free Sewn Bookmark Pattern | Easy DIY Bookmark | 10 Minute Bookmark
Summer is here and you may be having a lot more time on your hands! Summer is the perfect time to curl up with a good book whether you are on the beach, by a pool, or in your house in the air conditioning! Sometimes though you can't finish your book and need a bookmark! This week we will be making an easy DIY bookmark! This bookmark will be perfect for you to take on your vacations whether that vacation is in your house or not. Let's make a bookmark!


Video Instructions
Items Needed
 |
- 2 Pieces of 9 by 3 inch Cotton Fabric
- 1 Piece of 8 by 2.5 inch Cardboard (size may vary depending on ending size of sleeve)
- 3 Pieces of 6 inch Ribbon
Step 1: Cut out fabric, ribbon, and cardboard.
 |
Step 2: Pin fabric with right sides together, and sew the two long edges and one short edge, so the top edge of the bookmark remains open. Turn right side out.

Step 3: Press the seams.

Step 4: Place cardboard inside of bookmark.

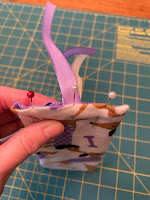
Step 5: Fold fabric at the top of the bookmark, place ribbon edges near the end of the fabric, and pin everything. This should allow for there to be no raw edges seen.

Step 6: Sew across the seam either using a machine or a hand needle. Once it's sewn, trim the extra thread!

Step 7: Enjoy your bookmark!


Comments
Post a Comment