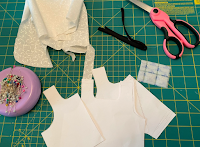
How to Sew an 18 inch Doll Shirt | Learn to Sew a Shirt for American Girl Dolls | Free 18 Inch Doll Shirt Pattern | Easy Sewing Projects
This is the second in our 18 inch doll clothes series! I played around with a lot of different fabrics and techniques when I was growing up, and the best way to do this was to sew doll clothes! This week I will be focusing on how to sew a shirt! Shirts are a little more tricky then skirts and I can tell you I have multiple shirts that look sad and messy because I used my sewing as a trial and error process! The pattern today is easy though, and you will be making plenty of shirts for 18 inch dolls in no time!
- 1 Piece of Fabric from Pattern Piece A (Top Front)
- 1 Piece of Fabric from Pattern Piece B (Top Back Left)
- 1 Piece of Fabric from Pattern Piece C (Top Back Right)
- 2 Pieces of Fabric from Pattern Piece D (Sleeves)
- 15 inches of Bias Tape*
- Velcro
- Pins
- Iron
- Ironing Board
- Scissors
- Thread
- Sewing Machine
- Hand needle (if using)
Step 1: Cut out all fabric pieces and a 15 inch of bias tape.
Step 2: Fold the bottom of pattern piece A, B, C, and D so that you create a small hem. Be sure you have the right side of the fabric facing away from you when you do this. This will remove the raw edges. Pin the hem and sew.
Step 3: Fold the lengthwise edges of the two back pieces (B and C) to put a small hem it in. Pin and sew for each piece.
Step 4: With right sides together line up the side of piece A and B and pin. Repeat this for pieces A and C. This is how we will sew up the sides of our shirt.
Step 5: With right sides together match up the straps of the shirt and pin. Sew along the edge so that you have a tank top.
Step 6: With the right side up, fold the sleeve so the longer straight edges match. Pin and sew. Repeat this for the second sleeve.
Step 7: Next we will connect the sleeve to the shirt. Turn each sleeve right side out as well as make sure the shirt is turned right side out. Insert the sleeve through the armhole and pin. Repeat this for the second sleeve.
 |
| Pinning the sleeve to the Shirt |
Step 8: Now we sew the sleeve! Carefully sew the armhole either with a machine or by hand sewing. It's easy to catch the fabric when sewing it at this stage, so slowly move around the circle. Repeat for the second sleeve.
Step 9: Take the bias tape and place it along the raw edge at the top of the shirt. Pin it in place, and then sew it so that the bias tape covers the raw edge and adds some contrast!
Step 10: Attach velcro to pieces B and C using either sew-on velcro or one with a sticky adhesive. Feel free to sew the velcro either way if you want it extra secure.
Step 11: Enjoy!
*Don't have any bias tape on hand? You can easily make some! Watch our video to learn how!
Pattern Pieces


Comments
Post a Comment