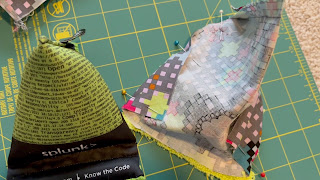
Create a Phone Wedge that can Clean your Phone!
After going to a conference a family member of mine had received what we are calling a phone wedge (some places call it a phone pillow or phone stand). It was a pyramid shaped structure that had a spot to hold your phone upright while having a microfiber bottom allowing for easy cleaning of the screen. I had been looking at it for a while as I realized this would be something easy to make, and it's incredibly useful! This was a fun challenge that turned out perfectly, and now I will share the instructions with you!
Items Needed
This week, I have linked the items so if you want to buy them when you are reading you can! This post contains affiliate links through Amazon, if you do choose to shop through these links, thank you for supporting me!
- Cotton Fabric
- Microfiber Fabric
- Stuffing
- Weighted Beads
- Thread
- Pins
- Scissors
- Sewing Machine
Step 1: Cut out the fabric. You will need one 10x9 inch rectangular piece of cotton, and one triangular piece of the microfiber. The measurements for the triangle were 5 inches across at the bottom and then 7.5 inches tall. Included is an image of what I cut out.
Step 2: Fold the cotton fabric together in half hamburger style, and pin up only one of the shorter sides, and take a seam.
Step 3: This part can take some time, but match the two long edges of the cotton fabric to the two long edges of the triangle microfiber piece with right sides together. I found that folding over some of the extra cotton fabric worked well for this step to give it a more fitted look.
Step 4: Sew both long edges, but keep a small opening on one side. This is how we will add the beads. Also be sure to keep the third edge open. Turn right side out, and you should now start to have the makings of a pyramid!
Step 5: Pin the fabric straight across about two inches up from the opening, as we will be taking two seams at this spot. This is where we will create the "notch" for our phone to sit. The seams allow there to be no stuffing. Take both seams.
Step 6: Fold in the long tube at the front in on itself to remove the raw edge. You will want to keep a small opening for stuffing, but you can make this as small as you feel you can while still getting stuffing in it. Once pinned up, top stitch along the edge.
Step 7: It's time to stuff and fill our wedge! I created a funnel using some old cardboard, and carefully funneled in the weighted beads into the main portion of the wedge. I did fill this on a rimmed cookie sheet trying to keep in any stray beads, but I would suggest placing down a silicon mat as well as the plastic beads just kept bouncing away..Once filled to how you like take a hand seam across.
Step 8: Stuff the long tube at the front of the wedge very firmly. Once stuffed, take a hand seam across as well.
Step 9: Enjoy and use your phone wedge!


Comments
Post a Comment