Sew a Heart Quilt - Valentine's Day Wall Hanging
Valentine’s Day Quilt Wall Hanging
This pattern will walk you through cutting out the fabric, laying out the pattern, and sewing it up into a fun wall hanging!
Final Dimensions: 41 X 36 inches (104x91 cm)
A full video walkthrough of making the wall-hanging is available on my YouTube Channel @SewEmmyDesigns: https://youtu.be/CImSbH6jy9I
Fabric Selection
This pattern has been tested using quilting cotton. Other woven fabrics may work for the wall-hanging, but for everything listed in this write up has only been tested with quilting cotton. This is a great scrap buster project due to the ability of using so many different colors!
Cutting out the Materials
7 pieces of 2.5 inch (6.3 cm) width fabric (length should vary)
My breakdown for length was: 5 inches (12.7 cm), 6 inches (15.2 cm), 7 inch (17.8 cm), two 12 inch (30.5 cm) strips and 15 inches (38.1 cm)
23 pieces of 3.5 inch (8.9 cm) width fabric (length should vary)
My breakdown for length was: 4 inch (10.1 cm), two 5 inches (12.7 cm), 6.5 inch (16.5 cm), 7 inches (17.8 cm), three 8 inch (20.3 cm), three 10 inch (25.4 cm), two 11.5 inches (29.2 cm), three 12 inches (30.5 cm), 13 inch (33 cm), two 14 inch (35.6), three 14.5 inches (36.8 cm), and 15 inch (38.1 cm)
10 pieces of 1.25 inch (3 cm) width fabric
My breakdown for length was: two 4.5 inch (11.4 cm), 7 inch (17.8 cm), 9.5 inch, 10 inch (25.4 cm), 11 inch (27.9 cm), two 13 inch (33 cm), 15 inch (38.1 cm), and 19 inch (48.3 cm)
1 yard (90 cm) white or cream fabric for a background
154x2 inches (391x5 cm) for the binding
1 yard (90 cm) of batting
1 yard (90 cm) for the backing
Thread of similar color
Optional - thread for quilting
Sewing Machine
Hand sewing needle (optional)
Pins or Quilting Clips
Fabric Shears/Rotary Cutter
Tape Measure
Sewing The Wall-Hanging
Common Practices:
All seams are done in a straight stitch
¼ inch (.95 cm) seam allowance
Be sure to back stitch all seams
Describing the Fabric
All fabric has a “right side” (the print of the material) and a “wrong side” (the back of the material) (Figure A). This pattern will refer to the right and wrong side when walking through the steps.
Figure A

Steps
Begin piecing out your fabric strips to create a heart pattern. I alternated colors and the sizes back and forth to create the patchwork heart look. (Figure 1) This was the final layout that I went with, but feel free to adjust the colors to your taste!
Figure 1

Working through each row of the fabric, begin to combine the strips together to create 17 rows. Note: some rows may only be one piece of fabric so this step can be skipped. To create one long row, with right sides together (Figure 2), place the strips on top of each other and take a seam on the short edge. (Figure 3) Be sure to back stitch your seam. Repeat this process until you have all the rows complete for the heart
Figure 2

Figure 3

Press open all the seams for the rows, so that the rows lay flat.
Figure 4

Once all the rows are completed, start laying out the rows in the heart pattern to begin piecing them together. Starting at the bottom select two rows (Figure 5), and place them with right sides together. One row will be shorter than the other due to the way the pattern works, so use a ruler to ensure the shorter row is centered to the larger row. (Figure 5) Sew the long seam. (Figure 6) Continue this process until the entire heart is complete.
Figure 5

Figure 6

When you get to the top portion of the heart, you will have two separate sections to form to create the curves. I measured out how much of a gap I wanted in the middle and built the heart out. I then continued with matching the rows right sides together and sewing the long seam (Figure 7)
Figure 7

Note: As you are building the heart you will notice that you are not sewing up the entire edge of each row leaving raw edges. This is correct and the raw edges will be handled in the applique portion of the quilt
Once the heart is complete, press all the seams open so the heart is smooth. (Figure 8)
Figure 8

For the top and bottom raw edges of the rows, fold the fabric over to match the seam allowance taken in the stitches and press flat (Figure 9). Repeat this for the top and bottom of the heart as well.(Figure 10) The only raw edges should be those on the sides of the heart. (Figure 11)
Figure 9

Figure 10

Figure 11

At this point the heart is complete, and ready to be sewn onto the cream (or whatever color material will be used on the front) fabric. Lay the heart on the fabric (Figure 11), and pin it in place for where you would like it to stay. (Figure 12 and 13)
Figure 12

Figure 13

Figure 14

Using a zig-zag stitch, work your way around the heart by slowly sewing each edge. (Figure 15) Be sure to take your time on the raw edges, as this stitch will remove the messy look of them.
Figure 15

At this point your quilt top is complete! Lay your quilt top on the batting and then have the backing facing away so that you are able to see the right sides of both pieces of fabric. (Figure 16) For quilting, since this is a larger quilt I hand basted the three pieces in place.(Figure 17 and 18) To do this, use a hand needle and thread and sew very large stitches so that the fabric does not slide or move.
Figure 16

Figure 17

Figure 18

For quilting, I machine quilted the heart using a stitch-in-the-ditch method, and then used a swirl pattern on the cream but anything will work nicely with it!
Figure 19

The last step is to add the binding. I made my own bias tape, and sewed it along the outside. There are multiple variations of adding bias tape so do whatever you feel comfortable with!
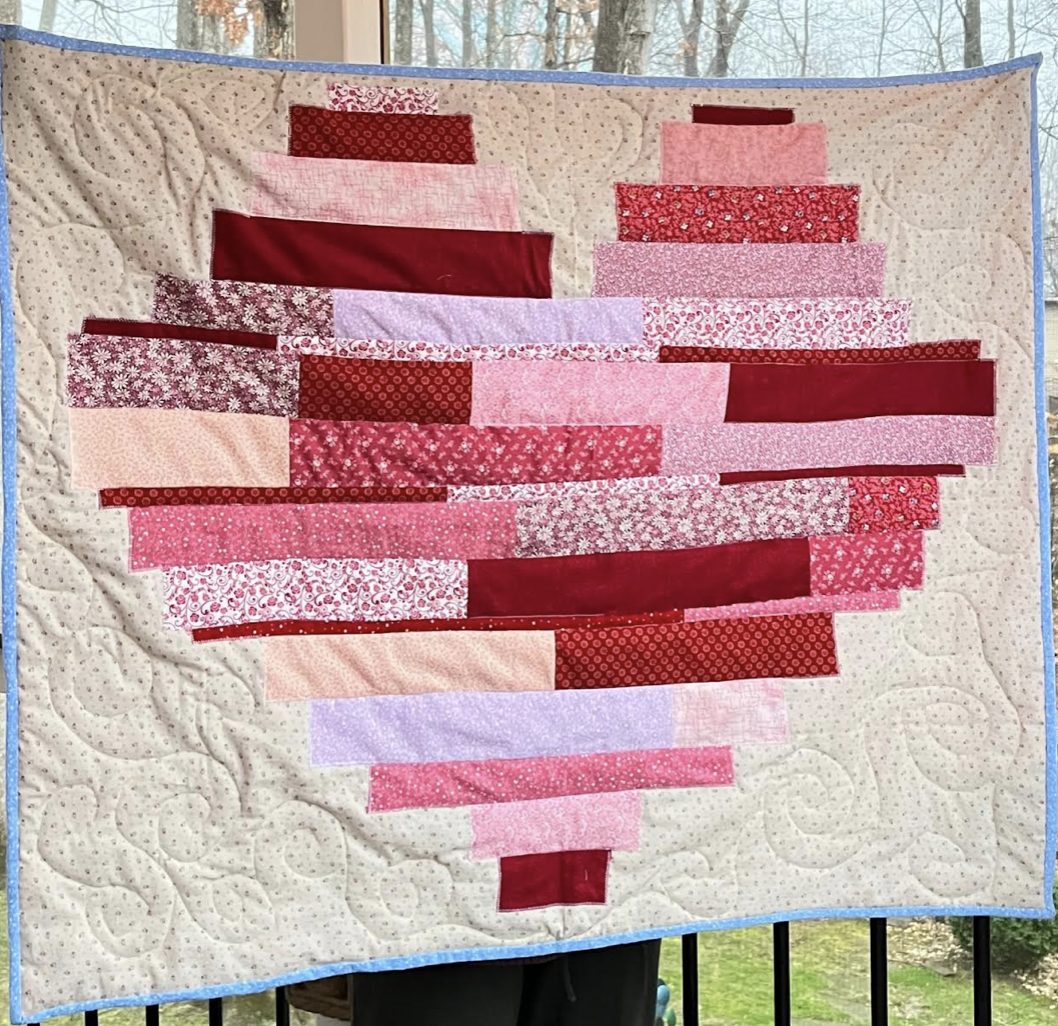
At this point your quilt is complete! (Figure 20) Be sure to check out my YouTube channel for a full video walk through (https://youtu.be/CImSbH6jy9I)!
Figure 20

Want some sewing or quilting supplies? Check out my Amazon Storefront! Note: I may make a small commission from any sales made through my storefront. No additional money is required from you! Thank you for your support :)


Comments
Post a Comment